नेटवर्क इंजीनियरों के लिए सुरक्षा टूल्स
Network Securityविषय सूची
नेटवर्क इंजीनियर या admin के रूप में काम करते हुए Nmap, Wireshark, tcpdump, Nessus, Greenbone, Burp Suite, Shodan, Suricata, Snort, Kali Linux, Metasploit, Hashcat और Cobalt Strike जैसे नाम बार-बार आते हैं।
कुछ बुनियादी टूल्स हैं, कुछ AppSec, forensics, blue team या red team के लिए हैं। मुख्य बात: security tool अपने आप hacker tool नहीं होता। फर्क अनुमति, लक्ष्य, दस्तावेज़ और उद्देश्य से बनता है।
कुछ टूल्स को खुद production में कभी न चलाने पर भी सही संदर्भ में पहचानना जरूरी है।
किसी टूल को गंभीर या खतरनाक उसका नाम नहीं, बल्कि उसका उपयोग-संदर्भ बनाता है।
सभी उदाहरण अपने systems, labs, staging या स्पष्ट रूप से authorized tests के लिए हैं। installation examples Linux और apt पर आधारित हैं।
यह लेख ranking या attack guide नहीं है। यह उस network engineer का दृष्टिकोण है जो समझना चाहता है कि कौन-से tools रोजमर्रा में मदद करते हैं, कौन-से security teams के पास होने चाहिए और कहाँ खास सावधानी जरूरी है।
इस लेख के सभी उदाहरण केवल अपने systems, labs, staging systems या स्पष्ट रूप से अधिकृत tests के लिए हैं। बिना अनुमति किसी दूसरे target को जाँचना सीमा पार करना है।
Installation examples जानबूझकर Debian, Ubuntu, Kali और apt वाले समान Linux systems पर केंद्रित हैं। Professional analysis setup का आधार साफ और अलग रखने के लिए दूसरी platforms यहाँ शामिल नहीं हैं।
सही कार्य वातावरण
गंभीर network analysis के लिए daily laptop नहीं, बल्कि dedicated Linux machine, अलग VMs, snapshots, isolated lab और encrypted customer data बेहतर हैं।
Daily device में mail, customer data, browser sessions, passwords, private files और production access बहुत पास होते हैं। Dedicated Linux workstation पर tools native चलते हैं, network cards सीधे नियंत्रित होते हैं और interfaces, routing, VLANs तथा capture rights बेहतर संभाले जाते हैं। Risky tests से पहले snapshots और project separation के लिए कई tools फिर भी VMs में होने चाहिए।
- Daily machine: communication, documentation, tickets, password manager.
- Linux analysis machine: encrypted disks, packet capture, network diagnostics, labs, VMs के लिए RAM.
- Security VMs: Kali/Parrot red team/AppSec के लिए, Debian/Ubuntu admin और blue team के लिए.
- Network hardware: USB Ethernet, managed switch, VLAN, mirror/SPAN.
- Wi-Fi hardware: monitor mode और packet injection वाला USB Wi-Fi adapter, केवल authorized tests के लिए.
- Isolated lab: test targets, intentionally vulnerable systems, अलग project folders.
- Customer environment: केवल approval, scope, time window और clear contact के साथ.
अधिक professional setup में अलग management और lab networks, Suricata या Zeek sensor और central log platform भी होते हैं। यह overkill नहीं है; अच्छी security साफ separation पर निर्भर करती है। Wi-Fi analysis में सही adapter तक भरोसेमंद USB passthrough भी आवश्यक है।
Professional लोग कोई जादुई “hacker laptop” नहीं चलाते। वे नियंत्रित Linux setup, reproducible labs, अलग workspaces और साफ reset किए जा सकने वाले tools इस्तेमाल करते हैं।
पहले layers अलग करें
Tool एक काम करता है। Framework modules और workflows देता है। Platform data, users और reporting जोड़ता है। Distribution पूरा workbench है। Concept जैसे SIEM या IDS/IPS solution class हैं।
Nmap, tcpdump और Lynis tools हैं। Metasploit, Recon-ng और Volatility frameworks हैं। Splunk, Censys, Maltego, Nessus, InsightVM, Core Impact और Cobalt Strike platforms हैं। Kali और Parrot distributions हैं, जबकि SIEM तथा IDS/IPS system classes हैं।
Visibility: आधार
मैं exploits से नहीं, visibility से शुरू करता हूँ: कौन-से systems मौजूद हैं, कौन-से ports खुले हैं, कौन-से packets वास्तव में गुजरते हैं, services क्या उत्तर देती हैं और कौन-से logs उपलब्ध हैं।
Nmap
sudo apt install nmap
Nmap inventory, firewall checks और service verification में काम आता है। इससे पता चलता है कि बदलाव के बाद service reachable है या नहीं, केवल अपेक्षित ports खुले हैं या कोई पुरानी test service भूल गई है।
# Check versions against an explicitly authorized Nmap test target
nmap -sV scanme.nmap.org

# Check selected ports only
nmap -Pn -p 22,80,443 scanme.nmap.org

# Save clean output for later comparisons
mkdir -p scans
nmap -sV -oA scans/scanme-baseline scanme.nmap.org

# Scan your own internal network only with authorization
nmap -sV 192.168.1.0/24
दूसरों के networks पर Nmap अंधाधुंध नहीं चलाना चाहिए। अपने network में यह assumptions को facts से बदलता है।
tcpdump
sudo apt install tcpdump
DNS debugging, routing, firewall rules, MTU issues और client packet server तक पहुँच रहा है या नहीं, इन सवालों के लिए tcpdump अक्सर सबसे तेज tool है।
# List interfaces
sudo tcpdump -D

# Observe DNS traffic on an interface
# Interface names vary by Linux system, for example eth0, ens18, or wlan0
sudo tcpdump -i eth0 -nn port 53

# Capture traffic to a specific host
sudo tcpdump -i eth0 -nn host 192.0.2.10

# Save the capture for Wireshark
sudo tcpdump -i eth0 -nn -w debug.pcap
Captures में sensitive data हो सकता है। उन्हें केवल आवश्यक समय तक रखें, सोच-समझकर share करें और broad capture के बजाय tight filters लगाएँ।
Wireshark
sudo apt install wireshark
Wireshark DNS, TLS, TCP, VoIP, SMB, LDAP और pcap analysis में मदद करता है।
मैं आमतौर पर tcpdump से संकीर्ण capture लेकर file को Wireshark में खोलता हूँ। इससे noise और बहुत बड़े captures दोनों घटते हैं। Capture rights किसे मिलते हैं, यह भी सचेत निर्णय होना चाहिए।
Shodan
Shodan Internet पर exposed systems दिखाता है।
यह local software नहीं, Internet-exposed systems का search engine है। अपनी domains, IP ranges, certificates, product banners, VPN gateways, remote-access systems, ICS/IoT और management interfaces बाहर से कैसे दिखते हैं, इसकी जाँच में यह दर्पण जैसा है।
Censys
Censys public hosts, certificates और services को internal inventory से मिलाने में मदद करता है।
यदि Censys ऐसी assets दिखाता है जो internal asset management में नहीं हैं, तो असली समस्या process में है। External exposure और inventory का यह मिलान इसका व्यावहारिक लाभ है।
Maltego
Maltego OSINT relationships दिखाता है।
Desktop application के रूप में यह domains, IPs, लोगों, organizations, email addresses और infrastructure के संबंध दिखाता है। सामान्य network administration में कम, लेकिन threat intelligence, fraud, investigation और complex OSINT में बहुत उपयोगी है।
theHarvester
# Use only against domains you own or are authorized to test
theHarvester -d example.com -b crtsh
theHarvester public sources से emails, hosts, subdomains और banners एकत्र करता है। Sources बदलते रहते हैं, कुछ API keys या rate limits मांगते हैं। Empty result का मतलब external traces न होना नहीं है। Defensive use में यह दिखाता है कि login के बिना अपनी domain के बारे में क्या पता चलता है।
Recon-ng
Recon-ng OSINT framework है।
यह reconnaissance के लिए workspaces और modules देता है। Repeatable workflows की जरूरत होने पर OSINT analysts, red teams और security engineers को single-purpose tool से अधिक संरचना मिलती है।
Amass
# Passively enumerate a domain you own or are authorized to test
amass enum -passive -d example.com
Amass external asset discovery और subdomain enumeration के लिए उपयोगी है। Passive mode कम intrusive है। Version के साथ flags और data sources बदल सकते हैं, इसलिए local syntax देखें। पुराने staging systems, भूली subdomains और orphaned DNS records खोजना इसका मुख्य लाभ है।
OSINT Framework
OSINT Framework OSINT sources का map है।
यह install होने वाला program नहीं, बल्कि domains, email, social media, images, phone numbers और public registers के लिए curated link collection है।
Gobuster
sudo apt install gobuster
Gobuster web paths, DNS और virtual hosts enumerate करता है। यह visibility और web security के बीच आता है क्योंकि documentation के बाहर reachable चीजें दिखाता है।
# Lab or staging target, never someone else’s website
gobuster dir -u https://staging.example.test -w wordlists/small.txt

# Enumerate virtual hosts in your own lab
gobuster vhost -u https://example.test -w wordlists/vhosts.txt
इसे किसी अन्य website पर न चलाएँ। अपने lab या staging में भूले path और virtual host ढूँढने के लिए यह अच्छा reality check है।
Vulnerabilities और hardening
CVSS technical severity, EPSS exploitation probability, और CISA KEV already exploited vulnerabilities दिखाते हैं।
Visibility के बाद सवाल है कि क्या vulnerable, outdated या misconfigured है। अच्छी prioritization इन signals को अपने exposure से जोड़ती है: Internet-facing system lab server से पहले, production test system से पहले और critical service मामूली finding से पहले आता है।
Greenbone / OpenVAS
Greenbone/OpenVAS vulnerability scanning stack है।
OpenVAS अब Greenbone ecosystem का भाग है, सामान्यतः Greenbone Community Edition या Greenbone Vulnerability Management। इसमें feeds, web interface, database और services होते हैं; official community containers या distribution packages इस्तेमाल करें, production server पर साथ में न डालें। Repeated और authenticated scans, reporting तथा prioritization उपयोगी हैं, पर scanner patch management का विकल्प नहीं।
Nessus
Nessus Tenable का commercial scanner है।
Platform-specific installer के बाद local service web interface देता है। साफ target ranges और scan window तय करें। Authenticated scans software versions और configurations सीधे जाँच सकते हैं, इसलिए केवल बाहर से अनुमान लगाने से बेहतर हैं।
Lynis
sudo apt install lynis
Lynis Linux और Unix-like systems का practical hardening तथा audit tool है।
sudo lynis audit system
यह logging, kernel parameters, SSH, file permissions, package state, malware scanners और baseline hardening पर संकेत देता है। इसे सब कुछ अपने आप ठीक करने वाला tool नहीं, technical checklist मानें।
HCL AppScan
HCL AppScan AppSec और DevSecOps के लिए है।
पुराना IBM AppScan नाम अभी भी मिलता है। Commercial editions web, API और software tests को lifecycle से जोड़ते हैं। Staging scans, API checks, developer reporting और remediation tracking के बिना AppSec tool केवल PDF generator बन जाता है।
InsightVM / Nexpose
InsightVM/Nexpose risk prioritization में मदद करते हैं।
Nexpose पुराना परिचित नाम और InsightVM आधुनिक platform view है। असली महत्व scan से आगे है: कौन-सी vulnerability critical, Internet-exposed, exploitable या business-relevant है? Network segmentation और reachability जोखिम को सीधे बदलते हैं।
Retina
Retina अब अधिकतर legacy context है।
BeyondTrust ने 2020 में पुराने Retina portfolio का end-of-life घोषित किया। आज इसे केवल पुराने reports या installations के documentation में रखूँगा। Deprecated scanner पर process निर्भर हो तो केवल tool नहीं, पूरी vulnerability-management प्रक्रिया की समीक्षा होनी चाहिए।
Web Application Security
Web tools विशेष रूप से dual-use हैं। अपने application को जाँचने वाली वही technique दूसरे के विरुद्ध misuse हो सकती है, इसलिए scope, test window और permissions अनिवार्य हैं।
Burp Suite
Burp Suite authorized web testing के लिए मुख्य proxy है।
यह browser और application के बीच HTTP requests दिखाता तथा analysis और repetition संभव करता है। PortSwigger की Community Edition learning और manual basics के लिए पर्याप्त है, Professional edition professional tests के लिए अधिक शक्तिशाली। वैध workflow में test browser proxy करना, test certificate लगाना और staging requests देखना शामिल है; यहाँ attack chain नहीं दी जा रही।
ZAP
ZAP free web scanner/proxy है।
पहले OWASP ZAP कहलाने वाला project अब ZAP या ZAP by Checkmarx नाम इस्तेमाल करता है। Desktop और CI/CD-near setup में यह open-source DAST का अच्छा प्रवेश है। Active scans केवल learning environment, internal application या authorized staging पर चलाएँ।
Nikto
sudo apt install nikto
Nikto known misconfigurations, dangerous files, पुराने server versions और common webserver issues जाँचता है।
nikto -host https://staging.example.test
यह noisy है, पर अपने server के baseline check में यही गुण उपयोगी है। हर finding का मूल्यांकन जरूरी है।
WPScan
wpscan --url https://wp-staging.example.test
WPScan WordPress core, plugins, themes और configuration पर केंद्रित है। RubyGems, container या packages से install हो सकता है और vulnerability database के लिए API access लग सकता है। Plugin बदलाव, बड़े updates या go-live से पहले authorized site पर चलाएँ, फिर results को manually जाँचें।
SQLMap
SQLMap public operational examples के लिए बहुत sensitive है।
SQL injection tests automate करने के कारण misuse risk अधिक है। केवल authorized AppSec test में, application scope के भीतर suspected injection verify करने के लिए इसका legitimate use है। सामान्य admin के लिए इसे चलाने से अधिक जरूरी यह समझना है कि यह क्या जाँचता है।
AppSpider
AppSpider Rapid7 का DAST product है।
Enterprise AppSec में crawling, authenticated scans, reporting और security-process integration देता है। Finding developer तक पहुँचकर remediation track न हो तो tool की value सीमित रहती है।
Passwords और authentication
Password tools legitimate audits में उपयोगी, पर सीधे misuse योग्य हैं। साफ authorization, isolated data और documentation के बिना इन्हें नहीं चलाना चाहिए।
John the Ripper
sudo apt install john
John the Ripper password audits और recovery का classic tool है। अपने hashes को wordlist या rules से जाँचना इसका defensive use है।
# Use only with authorized test hashes
john --wordlist=policy-test.txt hashes.txt
john --show hashes.txt
Password policy तभी विश्वसनीय है जब साधारण cracking tests के सामने टिके।
Hashcat
sudo apt install hashcat
Hashcat GPU-accelerated बड़े audits और recovery के लिए है; serious setup को सही drivers चाहिए।
# Example mode using your own test hashes and wordlist
hashcat -m 0 hashes.txt policy-test.txt
यदि weak passwords जल्दी मिलें, तो बेहतर MFA, password rules, blocklists और password dependence कम करने की जरूरत है।
Ophcrack
Ophcrack मुख्यतः historical है।
Rainbow tables के साथ पुराने Windows hash scenarios में यह जाना जाता था। Modern hashing और long passphrases के दौर में John, Hashcat, MFA और credential hygiene अधिक उपयोगी हैं।
Hydra / THC-Hydra
Hydra online logins test करता है और बहुत clear scope चाहिए।
Operational commands यहाँ जानबूझकर नहीं हैं। Online tests logs बनाते, accounts lock करते और authorization के बिना credential attack होते हैं। Legitimate use में own systems, defined accounts, rate limits, test window, owner approval और monitoring चाहिए।
Medusa
Medusa Hydra जैसा है।
यह भी network services के विरुद्ध parallel login tests करता है। Blue teams को failed logins, distributed sources, unusual protocols, lockouts और MFA prompt spikes पहचानने चाहिए।
Cain & Abel
Cain & Abel पुराना Windows tool है।
Password recovery, sniffing और ARP spoofing के लिए जाना जाने वाला यह tool अब practical recommendation नहीं है। Maintained modern tools इसे बदल चुके हैं; इसका महत्व security history समझने में है।
Wireless Security
Wireless tools hardware, drivers, radio environment और कानून पर निर्भर हैं। WLAN audit केवल अपने networks या स्पष्ट रूप से authorized customer environment में करें।
Aircrack-ng
sudo apt install aircrack-ng
Aircrack-ng Wi-Fi audit suite है जो captures और configurations जाँचकर weaknesses समझाता है। Access point attack steps यहाँ नहीं हैं। अपने lab में weak passwords, obsolete encryption और misconfigured WPS का जोखिम समझना इसका सुरक्षित उपयोग है।
Wifite
Wifite Wi-Fi audit automate करता है।
यह पीछे दूसरे tools चलाता है, इसलिए convenient और sensitive दोनों है। Professional audit में जानना चाहिए कि automation के भीतर कौन-सा tool क्या कर रहा है। यह daily admin tool नहीं, clear scope वाला lab या red-team tool है।
Kismet
Kismet Wi-Fi monitoring के लिए है।
Networks, clients और radio activity पहचानता तथा rogue access points खोजने में मदद करता है। सही adapter और driver जरूरी हैं। Wireless engineers इससे unknown devices और clients की radio activity देख सकते हैं।
AirSnort
AirSnort WEP history का हिस्सा है।
इसने दिखाया कि WEP cryptographically टिकाऊ क्यों नहीं था। Historical research के अलावा आज इसे install करने की जरूरत नहीं; modern समस्याएँ WPA2/WPA3, passphrases, enterprise authentication, certificates, rogue APs, evil twins और segmentation हैं।
NetStumbler
NetStumbler legacy tool है।
Early Windows WLAN discovery और site survey tool था। Modern operating systems, Wi-Fi standards और drivers के लिए अब current survey tools, Kismet, vendor tools या professional planning software बेहतर हैं।
Reaver
Reaver WPS risk याद दिलाता है।
यह खासकर PIN-based WPS की कमजोरी से जुड़ा है। Operational attack examples यहाँ नहीं हैं। Defensive lesson है WPS बंद रखना, router update करना, strong passphrases और sensible client segmentation।
Blue team, monitoring और detection
Blue-team tools कम आकर्षक दिखते हैं, लेकिन incident दिखाई देगा या नहीं, यह इन्हीं पर निर्भर है।
SIEM
SIEM logs collect, normalize, correlate और alert करता है।
SIEM एक program नहीं, system class है। Splunk, Elastic Security, Microsoft Sentinel, QRadar, LogRhythm या दूसरे platform चुने जा सकते हैं। Network devices, firewalls, VPN, DNS, proxies और IDS/IPS logs महत्वपूर्ण signals हैं; इनके बिना कई attacks केवल अंदाजा रहते हैं।
Splunk
Splunk common security data platform है।
यह server/indexer/search-head architecture या cloud service के रूप में चलता है। शुरुआत data से होती है: logs आ रहे हैं, timestamps सही हैं, fields normalized हैं और dashboards तथा alerts उपयोगी हैं या नहीं। Firewall, VPN, DNS, proxy और authentication data खास मूल्य रखते हैं।
Elastic Stack
Elastic Stack logs, search और dashboards देता है।
Elasticsearch, Logstash और Kibana के साथ अब Beats, agents तथा Elastic Security भी हैं। Self-hosting, containers और Elastic Cloud संभव हैं, पर storage, retention, parsing, permissions और operations की जिम्मेदारी भी आती है।
IDS/IPS
IDS detect करता है, IPS block कर सकता है।
Placement, rules, tuning और telemetry के बिना दोनों कमजोर हैं। गलत जगह sensor कुछ नहीं देखता, untuned system केवल noise बनाता है। North-south या east-west links, alerts या inline blocking, rules का owner और response owner पहले तय करें।
Suricata
sudo apt install suricata
Suricata modern IDS/IPS/NSM engine है, network telemetry, protocol analysis और EVE JSON logs में मजबूत। Existing pcap का analysis सुरक्षित शुरुआत है:
mkdir -p suricata-logs
suricata -r sample.pcap -k none -l ./suricata-logs
Production में sensor placement, rule sources, performance, false positives और SIEM integration महत्वपूर्ण हैं।
Snort
# Simple Snort 3 starting point with a pcap file
snort -r sample.pcap

# Example with alert output and a Snort 3 configuration
snort -c /usr/local/etc/snort/snort.lua -r sample.pcap -A alert_fast

# Alternative lab example with an explicit local rule file
snort -R local.rules -r sample.pcap -A alert_fast
Snort classic IDS/IPS है। Lab pcap से शुरू करें, production inline blocking से नहीं। Snort 3 snort.lua इस्तेमाल करता है; पुराने snort.conf examples बिना जाँच न लें। Signatures, true hits और false positives समझने में भी यह उपयोगी है।
Zeek
zeek -r sample.pcap
ls *.log
Zeek signature-first IDS नहीं, network security monitoring framework है। यह connections, DNS, HTTP, TLS, files, certificates, SSH और DHCP के structured logs बनाता है। Suricata अक्सर rule और alert केंद्रित है; Zeek समय के साथ network behavior, hunting और correlation में मजबूत है।
NetFlow / IPFIX
NetFlow/IPFIX flow metadata हैं।
Source, destination, ports, protocol, duration और volume दिखते हैं, payload नहीं। Full capture के बिना बड़े networks में unusual outbound traffic, unexpected countries और east-west connections ढूँढे जा सकते हैं। Routers, switches, firewalls, sensors और collectors data दे सकते हैं।
Full Packet Capture
Full Packet Capture पूरा traffic save करता है।
यह शक्तिशाली, पर storage, privacy और operations में महँगा है। Internet edge, critical server segments, lab, incident-response window या high-risk environment जैसे चुने points पर उपयोग करें। Arkime, Stenographer और Security Onion captures को searchable बना सकते हैं, पर sensitive data की जिम्मेदारी भी बढ़ती है।
OSSEC
OSSEC host-based IDS है।
यह logs, file integrity, rootkit detection, policy checks और active response देखता है। Production को manager, agents, rules, alerts और response process चाहिए। New files, logins, suspicious processes और changed configurations जैसे कई attacks host पर साफ दिखते हैं।
छोटा नोट: OSCO, OSSEC या OSSIM?
OSCO यहाँ स्थापित नाम नहीं है; OSSEC या OSSIM देखें।
Term साफ होने तक OSCO install या recommend नहीं करूँगा। गलत tool name किसी source को बिना verification अपनाने का संकेत हो सकता है।
Forensics और incident response
Forensic tools attack के लिए नहीं हैं; incident के बाद क्या हुआ, यह समझने के लिए हैं।
The Sleuth Kit
sudo apt install sleuthkit
The Sleuth Kit filesystem और disk analysis का CLI collection है। DFIR में images, filesystem structures और artifacts की जाँच करता है। यह polished interface नहीं, गहरा toolkit है।
Autopsy
Autopsy graphical forensic platform है।
The Sleuth Kit पर आधारित होकर cases, images, timelines, files, browser data और दूसरे artifacts जाँचता है। Daily admin से अधिक incident response में मूल्यवान है।
Volatility
vol -f memory.raw windows.info
vol -f memory.raw windows.pslist
Volatility RAM images में processes, network connections, DLLs, handles और malware traces खोजता है। कुछ attacks disk की तुलना में memory में अधिक साफ दिखते हैं।
Guymager
Guymager forensic images बनाता है।
यह bit-exact disk images बनाता है। वास्तविक evidence case में chain of custody, write protection, hashes और documentation tool जितने ही महत्वपूर्ण हैं।
Foremost
sudo apt install foremost
Foremost raw data से headers और footers के आधार पर file carving करता है।
foremost -i disk-image.raw -o recovered-files
Deleted files या damaged metadata में उपयोगी है, पर सही forensic methodology का विकल्प नहीं।
Binwalk
sudo apt install binwalk
Binwalk router, IoT और embedded firmware में filesystems, configurations या key material ढूँढने के लिए उपयोगी है।
binwalk firmware.bin
binwalk -e firmware.bin
दूसरे की firmware को analyse करना अपने आप वैध नहीं है; legal clarity जरूरी है।
Red team और high-risk dual-use
ये tools authorized red-team engagements में legitimate हो सकते हैं, पर exploitation, phishing और command-and-control के करीब हैं। इसलिए यहाँ classification है, operating guide नहीं।
Metasploit Framework
msfconsole
Metasploit controlled test में vulnerability verify और attack path reproduce करता है। Lab या साफ pentest scope के बिना इसका उपयोग नहीं होना चाहिए। Blue teams known techniques के विरुद्ध detection जाँचने में भी इसे इस्तेमाल कर सकती हैं।
ExploitDB
ExploitDB risk समझने में मदद करता है।
यह exploits और proofs of concept का database है, software suite नहीं; website या Kali के searchsploit से देखा जाता है। Public exploit code patch priority, exposure और detection को प्रभावित करता है, code चलाना जरूरी नहीं।
Core Impact
Core Impact commercial pentest platform है।
यह structured authorized tests के planning, execution, reporting और tracking की enterprise platform है, casual personal installation नहीं।
Cobalt Strike
Cobalt Strike केवल licensed और authorized engagements में।
यह sensitive adversary-simulation platform official vendor licensing से ही लिया जाना चाहिए। Professionals blue-team detection को यथार्थ रूप से जाँच सकते हैं, पर गलत हाथों में यह गंभीर misuse tool है; इसलिए commands या operational patterns नहीं दिए गए।
GoPhish
GoPhish phishing simulations के लिए है।
Isolated server, approvals, privacy review, target groups, communication plan और result handling के बिना इसे नहीं चलाना चाहिए। Organization को पता हो कि क्या test हो रहा और results कैसे उपयोग होंगे, तभी यह legitimate awareness measurement है।
HiddenEye
HiddenEye misuse के करीब है।
इसे सामान्य enterprise tool नहीं मानता। Malware/phishing research या tightly controlled training के बाहर इसका उपयोग अनुचित है। Defense में phishing-resistant MFA, mail filters, browser isolation, reporting और awareness महत्वपूर्ण हैं।
SocialFish
SocialFish समान category में है।
Serious awareness program के लिए GoPhish या commercial platform reporting और governance में बेहतर हैं। ऐसे toolkits की उपलब्धता दिखाती है कि password-only MFA और training अकेले पर्याप्त नहीं।
EvilURL
EvilURL lookalike domains से जुड़ा है।
Homograph domains brand protection और phishing defense में relevant हैं। Defensive monitoring वैध है, पर deceptive domains बनाना misuse हो सकता है। DNS/domain monitoring, DMARC/DKIM/SPF और clear communication domains जरूरी हैं।
Evilginx
Evilginx traditional MFA की limits दिखाता है।
Adversary-in-the-middle phishing framework होने से यह credential और session theft के बहुत करीब है, इसलिए commands नहीं हैं। Legitimate red-team test भी कड़े control में होना चाहिए। Defense में FIDO2/WebAuthn, Conditional Access, device binding, token protection, login telemetry और तेज response आते हैं।
Distributions as work environments
Kali Linux
Kali security distribution है।
Pentesting, forensics, reverse engineering और research tools वाली Kali को daily OS के बजाय Linux host पर VM बनाकर इस्तेमाल करूँगा। Preinstalled tools बिना समझे चलाने का आकर्षण पैदा करते हैं; Kali ज्ञान का विकल्प नहीं।
Parrot OS
Parrot OS security/privacy distribution है।
Pentesting, OSINT और forensics के isolated work environment के रूप में उपयोग करें। Snapshots रखें और private data या production customer access के साथ न मिलाएँ। Distribution choice से अधिक responsible use मायने रखता है।
Security Onion
Security Onion NSM, threat hunting, logs और incident response पर केंद्रित है।
यह desktop toy नहीं, sensor और monitoring platform है। Suricata, Zeek, logs, dashboards, alerts और investigation workflows individual tools को detection setup बनाते हैं। tcpdump एक पल का प्रश्न हल करता है; अच्छा sensor दिनों और हफ्तों का network behavior दिखाता है।
मैं network engineer के रूप में क्या रखूंगा
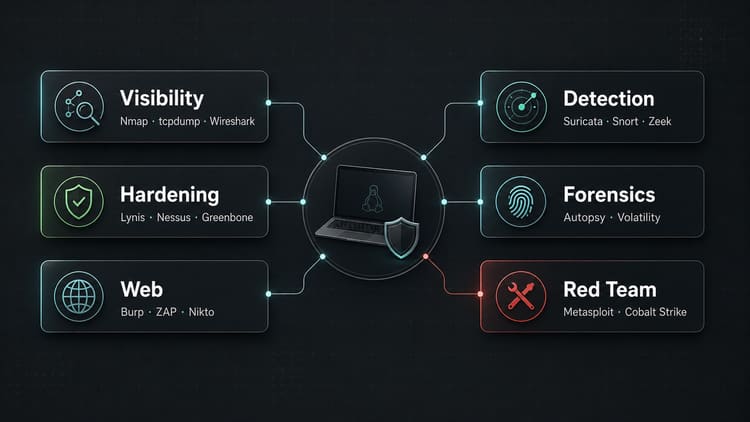
Visibility: Nmap, tcpdump, Wireshark.
External surface: Shodan, Censys, Amass, theHarvester.
Hardening: Lynis, Greenbone/OpenVAS, Nessus.
Web: Burp Suite, ZAP, Nikto, WPScan.
Detection: Suricata, Snort, OSSEC, SIEM.
NSM: Zeek, Security Onion, NetFlow/IPFIX, Full Packet Capture.
Forensics: Autopsy, The Sleuth Kit, Volatility, Guymager, Foremost, Binwalk.
Red team: Metasploit, Cobalt Strike, Core Impact, SQLMap, GoPhish, Evilginx केवल mandate और scope के साथ।
Historical context के लिए Cain & Abel, AirSnort, NetStumbler, Retina और Ophcrack, हमेशा स्पष्ट legacy label के साथ।
निष्कर्ष
सबसे अच्छा toolkit सबसे लंबा नहीं, बल्कि वह है जिसमें हर tool का कारण साफ हो।
Nmap और Wireshark network समझाते हैं। Lynis, Nessus और Greenbone weaknesses दिखाते हैं। Snort, Suricata, OSSEC और SIEM अंधापन घटाते हैं। Burp, ZAP और WPScan web security में मदद करते हैं। Forensic tools incident के बाद अनुमान घटाते हैं। Red-team tools defense को यथार्थ रूप से जाँचते हैं, लेकिन केवल साफ mandate में।
असल सीमा “admin tool” और “hacker tool” के बीच नहीं, responsible operation और unauthorized use के बीच है।
फिर मिलेंगे,
Joe